Now that floors have been installed, usually I proceed with the walls. But because the rooms of the CC are rather on the shallow end…figured I should at least start trying to see what furniture will fit.
For this project, I decided to deviate once more and actually use something different. It’ll still be a residential urban townhouse…but again, because space is limited, I had to carefully pick up what pieces I want to use.
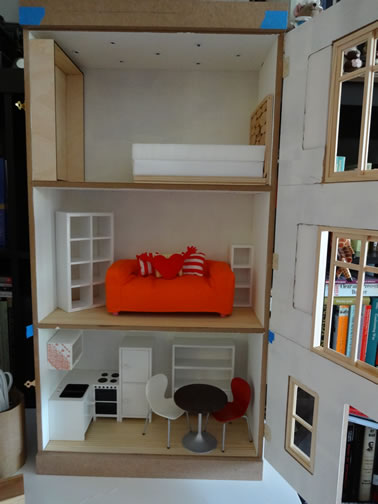
Doing a furniture trial fit of sorts…
For example, the first floor I wanted this to be a combination of a compact kitchen and dining area. So I used some old IKEA dollhouse furniture (their Lillabo line from the early 2000s….man I wish IKEA hadn’t discontinued this line), and a Rement cafe set. The kitchen wall cabinet is a discontinued Rement piece (think from their Storage Beauty line).
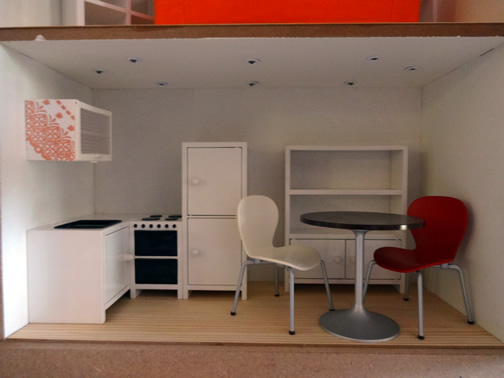
Cafe table & chairs are Rement’s Wood Cafe collection; purchased at http://www.superbuzzy.com. White toy sink, stove, fridge, and white hutch were part of IKEA’s discontinued Lillabo doll furniture line (purchased via EBay). Wall cabinet was part of Rement’s Storage Beauty series (purchased via EBay).
The second floor would be the living room. Again, the space really limited my selection, so I had to be really careful with what I wanted to use.
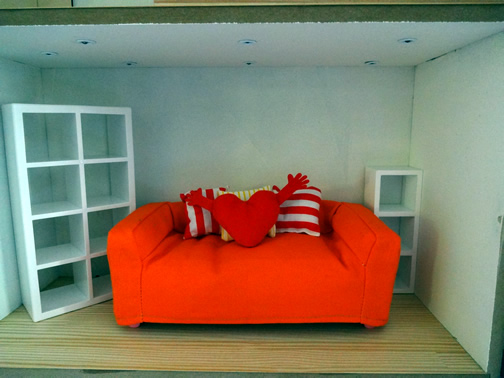
Couch, heart shaped pillow, and large white bookcase: part of the IKEA huset doll furniture set. Smaller white bookcase purchased from Manor House Miniatures. Other pillows were from IKEA’s Lillabo collection. Slipcover purchased from PaperDollProductions (Etsy).
The bookcase on the left, the heart shaped pillow, and the couch were actually part of IKEA’s new Huset doll furniture set. Granted, the set is a bit big on 1:12 scale, but I love the pieces so much…I actually bought a couple of boxes of this set during a trip to our local IKEA store. The couch originally had a pink slipcover, but I found a vendor on Etsy called PaperDollProductions who creats custom slipcovers and accessories to go with this doll furniture set. Suffice to say, I put an order for the orange slipcover and padded the plastic couch with batting to make it a little more comfy looking. The smaller white bookcase was a modern storage unit I found on Manor House Miniatures.
For the third floor…I decided this would be a bedroom of sorts.
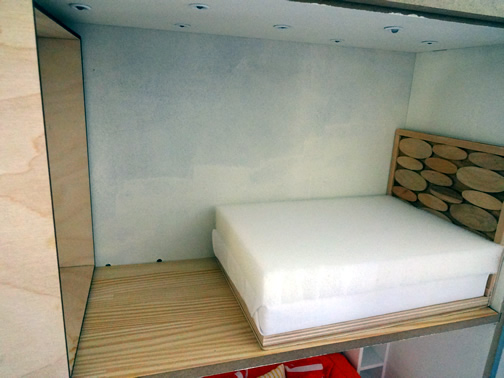
The bed was a custom piece I had built by Gigi N Studio (Etsy) based on one of her modern 1:12 scale bed. Miss Gigi was so nice to take my request to change the dimensions of the bed to accommodate my project, and she quickly produced this lovely piece. I used a piece of craft chair cushion (about 1/2″ thick) to create the boxspring and mattress.
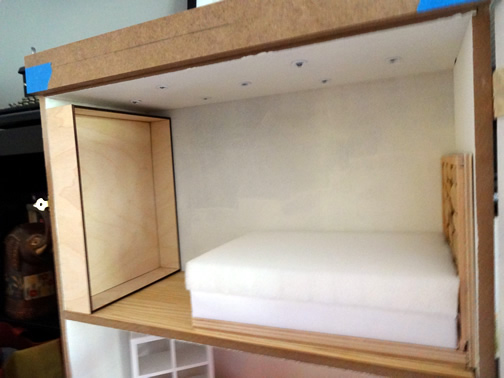
Across from the bed, I used a shadowbox kit that I purchased from Porkchop Art Part (Etsy) as the base for a closet/wardrobe unit. I assembled the shell, but am waiting on a few wood trim and parts to assemble the shelves and racks.
Now if you notice on the photo, the furniture isn’t exactly 1:12 scale. In fact, they seem kinda big and bulky. The truth is folks…I’m designing the CC for a rather particular set of occupants. Guess you can say, they’re my muses for this project.
So with further ado….meet Dasha.
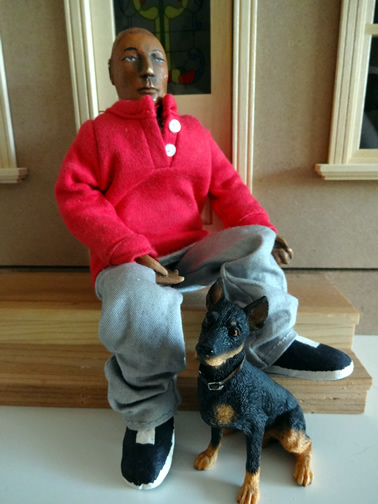
Dasha with his pet doberman, Sophie.
You can tell from this photo that he looks mighty tall to be a 1:12 scale doll. And you’re right — he’s actually close to being about 7.75″ in height. Because of that, I had to really look around for furniture that would accommodate him. Heck, even his dog Sophie seems tiny against him (and she’d be a good size dog in 1:12 scale).

Dasha in modern garb. I decided to keep the chip on his nose while repairing everything else.
Now in terms of where I got him…I actually found him in April 2013 in an antique shop up in Cape Cod, right in the hometown where BK grew up. We were in the area as BK’s younger brother MK was getting married. And one afternoon, we decided to check out this shop because we heard the shopkeeper had a big collection of antique nautical items (which was something BK wanted to check out).
When we got to the shop, I noticed that as BK and I were entering the place, a family with a bunch of young children were hurriedly leaving the premises. We didn’t think much about it until we got inside and were greeted by the shopkeeper. Judging from the flustered look on his face, BK and I risked asking him if he was okay.
The shopkeeper said he was fine, but he was a little upset with the family that left because one of the children had apparently broken one of his merchandise. When I asked what it was, he pointed at something beside the cash register. And lying sprawled beside the register, was Dasha.
He was indeed a sorry sight. He had a mop of black hair that was half on, half off his head. His nose looked chipped, and his hands looked like they were covered with something sticky. Even worse were his clothes — he was wearing what looked like a very worn out silk robe and trousers, and the sleeves looked like they were yanked hard at the seams. Suffice to say, he looked like someone that got seriously man-handled.
The shopkeeper explained that one of the children managed to get the doll off the shelf and started banging him against every piece of furniture, tugging at his clothes, and pulling at his limbs. When the shopkeeper finally asked the parents to tell their child to stop or they’ll have to pay for the doll, the child flung the doll to the floor — where Dasha’s nose and hand chipped. I guess the parents were so mortified that they just gathered their children and hustled out to the door as we were coming in.
I’m not sure why, but when I held the doll, I got the feeling that I should take him home, and that I should call him Dasha. Without skipping a beat, I asked the shopkeeper if I could purchase him. Guess he was surprised, but seemed relieved when I told him I collect doll furniture, and might be able to do something to repair the doll.
Once BK and I returned to our house, I spent the next couple of weeks repairing him. I ended up just removing his beat up wig and gently washing the wooden parts with wood soap and sanding off any glue residue. I took him to a furniture restorer, and the owner was nice enough to repair his hand. His clothing I ended up removing since it was beyond repair, and clumsily restitched his cloth body while I replaced his metal limbs with new gauze (the original wrappings were cotton strips. I ended up using gauze since it was easier to work with). Ended up dressing him in modern garb (used some Ken doll clothes and rehemmed the pants to fit him better), and for shoes, I covered his metal feet with paper clay and painted them to resembled wearing a pair of kicks.
By the time I finished repairing Dasha, it was already July 2013. At that point, work was starting to eat more of my time, so I had to put things off with my hobby. I would have put Dasha in the same storage bin as my other doll cast, but I kept having this nagging feeling that he needed to be around. So I put him to sit on a shelf above my desk. Eventually, I decided to give him company and picked up his faithful Doberman Sophie from an eBay auction.
But on August, I came across this find on Ebay.

Everyone, this is Lena.
Because I tend to use vintage Dawn and Pippa fashion doll clothes to dress my 1:12 scale dolls, an online buddy told me about these vintage dolls from the late 1950s-1960s called Miss Dollikin. Apparently they were created by Uneeda and the dolls were unique in how they were constructed. In order to make them more poseable than their competitors, Uneeda constructed the Lil Miss Dollkin as a strung doll — meaning inside the doll’s body, its limbs are connected inside by a type of strung elastic. This allows the doll to be posed in slightly more natural, human-like positions.
I was definitely curious, and decided that if I see one on eBay that I liked, then I’ll get it. Again, not sure if the mini gods were at work or something…but I did find one that I liked, and a few days later, she (who I named Lena) arrived at my house. I ended up replacing her outfit with the one you see in the photo….though I need to find red shoes to go with her getup.
Guess sparks flew between the two of them…because they’re always together. Either that, or I was just too lazy to put them elsewhere. 🙂